Building CLI application with GO
This article explains how to create a simple application in Go and access the feature using a CLI interface-
 Sriram Thiagarajan
- July 31, 2021
Building CLI application with GO
This article explains how to create a simple application in Go and access the feature using a CLI interface
CLI (Command Line Interface) apps can be helpful for developers who are mostly working on the terminal and don’t mind having a simple interface. This is also a great starting point for learning Go as we can build functionality and have a bunch of commands for your users to use.
Overview
- Introduction
- Creating an app in Go
- Creating business logic (Pomodoro Time management technique)
- Creating CLI for users to interact
- Building and Running the CLI
- Summary
Introduction
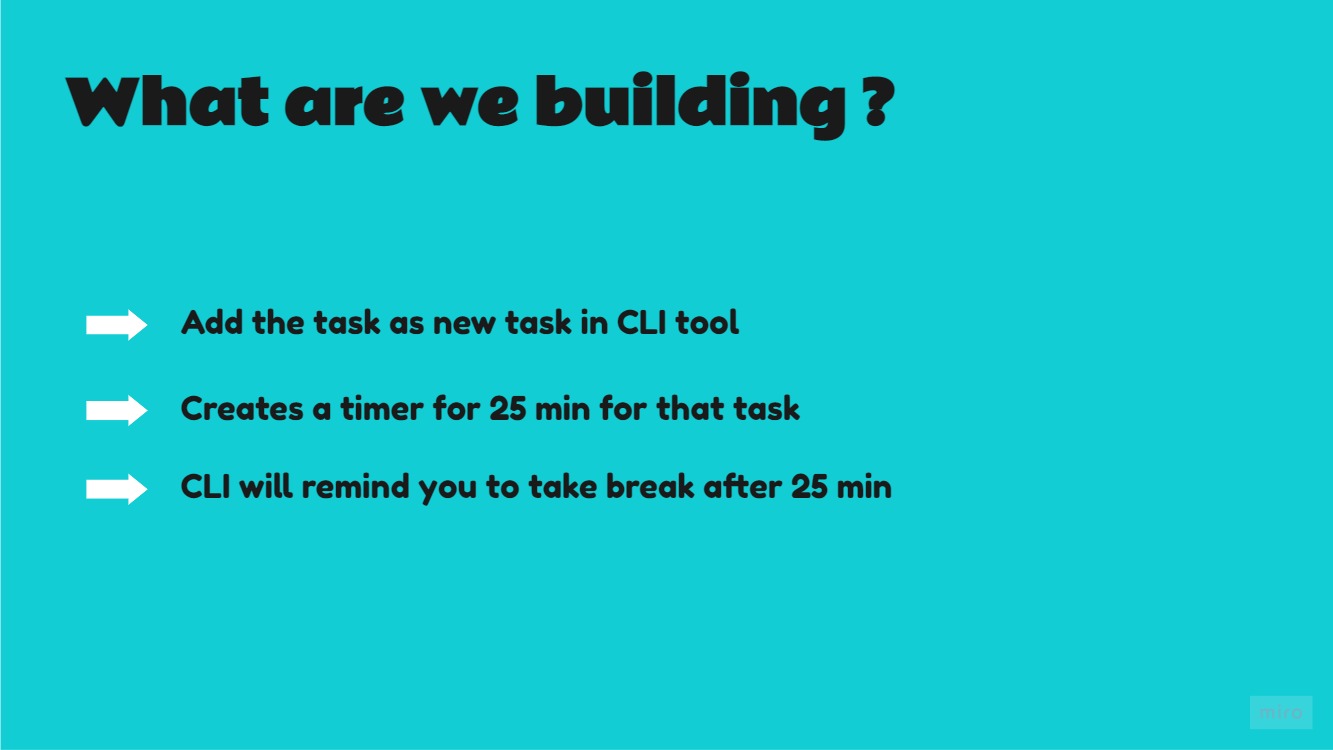
Building a simple go program that will take a task being performed by the user and create a timer for 25 minutes. During this time the user is meant to fully focus on the task which he wants to do. After the timer runs out, we will print out that the timer is done. Users can take a break once the timer is complete and start the cycle again until the task is complete
The above-mentioned activity is a time-management technique known as “The Pomodoro Technique”. We are going to build a very bare-bones version of the technique which just one task which the user can add and then reminding the user that the timer is complete
Souce Code : https://github.com/eternaldevgames/pomodoro-go-cli
Creating an app in Go
Create a new directory for your app and initialize Go app using the go mod init {packagename} command
mkdir pomodoro-go-cli
go mod init pomodoro-go-cli
You will have go.mod file created in the same folder which will contain the package name and other metadata about our application.
We can start by creating a main.go file in the root directory and start by writing a simple print statement to print to the console.
package main

import "fmt"

func main() {
	fmt.Println("Pomodoro App !!")
}
Run the following command to see the print statement in the terminal.
go run main.go

Output: Pomodoro App !!
Great! Now that we have an app running in the console, we can start building the business logic of our app in a separate file.
The idea here is to separate your CMD (Command Line Interface) and the business logic into a separate file that will help you in the following ways
- Separation of concern
- Easy to test
- Expanding to other interfaces is easy in the future (HTTP API, UI Application)
Creating business logic (Pomodoro Time management technique)
Add the function and business logic to create a new task, print the current task. Start by creating a new file `pomodoro.go` in root folder
Creating a new task struct
We can start by writing a struct for our task which can hold more information about the task
structare a typed collection of fields for grouping data together
type Pomodoro struct {
	// Name of the task
	TaskName string

	// Start time of the task created by the user
	StartTime time.Time
}
Our simple application just need two fields in the struct
- TaskName - Storing the name of the task entered by the user
- StartTime - Time when the task was created. (For simplicity, we will assume the user starts working on the task immediately after it is created)
Storing the current task
Multiple options are available to store the current task to some persistent storage and we are not going to take any of those :)
Keeping it simple for this article, we will just store the current task as an in-memory variable and so task value will be lost once we close the program.
Extending this to storing the value in a database can be done as a bonus exercise to learn further.
Create a variable at the top of the file after the struct declaration
var currentTask Pomodoro = Pomodoro{}currentTask - Varaible name for storing the currentTask
We are assigning an empty struct to the variable to differentiate between no task and having a current task
Adding the new task
AddTask function takes in taskName as input parameter of type string and returns a new Pomodoro struct. StartTime variable can be inferred without being passed since the value we are going to store is the current time when the AddTask function is called.
We can get the current time in Go using time.Now() function and import the time package
import (
	"fmt"
	"time"
)

func AddTask(taskName string) Pomodoro {

	return Pomodoro{
		TaskName:  taskName,
		StartTime: time.Now(),
	}
}
We can use the struct returned to store it in the variable as currentTask
Print the task to console
Implement a PrintTask function to print to the console.
func PrintTask(task Pomodoro) string {
	// Check for empty struct
	if (Pomodoro{} == task) {
		return "Current task is empty"
	} else {
		return "Task - " + task.TaskName
	}
}
Update your main function to call the new code to add and print the task
func main() {

	currentTask = AddTask("Write a blog")
	fmt.Println(PrintTask(currentTask))

}
Testing your business logic
Testing your code plays a major role when you are adding more features and want to make sure that you are not affecting the existing code. It also helps in writing better code as we will refactor our code during tests
We can start by creating a new file pomodoro_test.go in the root folder. testing package from the standard library can be used to start with our basic test.
We are going to test the following
- AddTask function - Simple test to check if the task name specified is the same as the task name created
- PrintTask function - Test to check if it returns the current task
- PrintTask function - Test to check if it returns the proper test for empty task
package main

import "testing"

func TestAddTask(t *testing.T) {
	expectedTaskName := "Testing task"
	newTask := AddTask(expectedTaskName)

	if newTask.TaskName != expectedTaskName {
		t.Errorf("TestAddTask Failed - Expected: %s Got: %s", expectedTaskName, newTask.TaskName)
	}
}

func TestPrintTask_WithTask(t *testing.T) {
	expectedTaskName := "Testing Task"
	newTask := AddTask("Testing Task")

	printOutput := PrintTask(newTask)
	expectedPrintOutput := "Task - " + expectedTaskName

	if printOutput != expectedPrintOutput {
		t.Errorf("PrintTask Failed - Expected: %s Got: %s", expectedPrintOutput, printOutput)
	}
}

func TestPrintTask_Empty(t *testing.T) {

	printOutput := PrintTask(Pomodoro{})
	expectedPrintOutput := "Current task is empty"

	if printOutput != expectedPrintOutput {
		t.Errorf("PrintTask Failed - Expected: %s Got: %s", expectedPrintOutput, printOutput)
	}
}
In all of the tests, we are following a simple pattern.
- Call the function with the intended inputs -
newTask := AddTask(expectedTaskName) - Create a expectedOutput variable with the expected output -
expectedTaskName := "Testing task" - Check if the output of the function and expected output are equal -
if newTask.TaskName != expectedTaskName
Run the go test command to run the tests
Creating CLI for users to interact
We have the business logic for our application completed and so now let’s focus on creating the CLI for the users to add task
We are going to just use standard packages of Go to get the input. There are other packages that are suitable for creating a full-fledged CLI but those are outside the scope of this article. You can refer cobra if you want a more powerful package
In this article, we will use the flags package of the standard library to get the input from the user.
func main() {
	taskPtr := flag.String("task", "", "Task to add. (Required)")
	flag.Parse()
}
Getting input from the user
flag package has a few functions to help in getting the input. We are using the flag.String function to get input. We are passing in three arguments as follows
- Name of the flag - Name used by the user in the CLI to send input
- Default value - Provide a default value if the user has not entered the argument
- Usage - String to help explain the argument to the user
flag package returns a pointer to a string and not the actual value. So to access the value inside the pointer, we need to use the *{variable_name}
If you are unfamiliar with pointers, you can refer to this link
Parse() function needs to be called after defining all the flags and before reading the input from the flags.
Checking for required input flag
	if *taskPtr == "" {
		flag.PrintDefaults()
		os.Exit(1)
	}

	currentTask = AddTask(*taskPtr)
Since we want the “task” to be a required input from the user, we can have an if condition checking the value of the flag and exit if it’s empty.
Calling the flag.PrintDefaults() will print the usage string of the flag and tell the user that “task” input is required
After this, we can assign the task to our currentTask variable by calling the AddTask function and passing the value of the task pointer
Creating the timer for the task
Following the pattern of this article and keeping the idea of simplicity, we will use the standard time package again to create a timer and wait for the timer to complete.
NewTimer function is present in the time package which can be used to create a timer
	currentTask = AddTask(*taskPtr)

	fmt.Printf("Start the task! Focus on %s\n", *taskPtr)

	timer1 := time.NewTimer(25 * time.Minute)
	<-timer1.C

	fmt.Println("Congrats! Task time is complete. Take a break")
timer object will return a pointer which will contain a channel that notifies how long timer will have to wait
The syntax for the NewTimer function
func NewTimer(d Duration) *TimerWe are providing a duration of 25 minutes and so we can multiply 25 with the time.Minute constant to let the timer run for 25 minutes
For testing the code, change the time.Minute to time.Second
The app will now wait for the timer to complete since we are waiting for the notification from the timer channel. So the final Println statement will only get printed after the timer is complete.
This method is a naive way to just wait for the asynchronous timer. Note that if the user exits the CLI in the middle, CLI won’t be able to respond after that and we are not persisting the task provided by the user.
Here is the full main.go file for clarity
package main

import (
	"flag"
	"fmt"
	"os"
	"time"
)

var currentTask Pomodoro = Pomodoro{}

func main() {

	taskPtr := flag.String("task", "", "Task to add. (Required)")
	flag.Parse()

	if *taskPtr == "" {
		flag.PrintDefaults()
		os.Exit(1)
	}

	currentTask = AddTask(*taskPtr)
	fmt.Println(PrintTask(currentTask))

	fmt.Printf("Start the task! Focus on %s\n", *taskPtr)

	timer1 := time.NewTimer(25 * time.Minute)
	<-timer1.C

	fmt.Println("Congrats! Task time is complete. Take a break")
}
Building and Running the CLI
Application is ready to be built and we can test how the user will run the app by passing the task as an argument
To build the app, run the following command in the root folder
go build .The above command will generate pomodoro-go-cli file. This name is defined in the go.mod file and it will be the initialized module name
If you are in linux based environment, before executing the CLI you need to add the execute permission for that file
chmod +x ./pomodoro-go-cliAfter adding the execute permission for the file, you can run the file using the cmd and pass the task argument for our app to run
./pomodoro-go-cli --task "Writing blog"

Output:
Task - Writing blog
Start the task! Focus on Writing blog
(After 25 min.....)
Congrats! Task time is complete. Take a break
Let’s check the other case when the doesn’t specify the task in the cmd
./pomodoro-go-cli

Output:
  -task string
        Task to add. (Required)
Summary
Go provides a lot of good packages from the standard library which can help build applications with ease and without a lot of dependencies. These packages are simple to use hence using them to learn basic concepts is useful
In this article, we discussed the following items
- Initialize a go application
- Build and Test the business logic
- Building a CLI interface for users to consume the application
- Running the CLI
Full source code is available in the following GitHub link https://github.com/eternaldevgames/pomodoro-go-cli
Stay tuned by subscribing to our mailing list and joining our Discord community