Svelte - Login and Authentication with Supabase
Building Login and Signup component using Svelte and connect to Supabase for authentication-
 Sriram Thiagarajan
- September 30, 2021
Svelte - Login and Authentication with Supabase
Svelte Authentication
Modern frontend application needs some way to verify the user. Creating an account for users in our application will let us engage with the users and provide some personalized experience for the users. There are multiple ways to achieve this and for today we will look at how to get this working with Svelte and Supabase
What are we building?

Supabase Introduction
Supabase is an open-source project which claims to be a Firebase alternative. It provides most of the backend services you would need to build an application. It provides a Postgress database, Authentication, Storage options, and more.
Getting started with Supabase seems to be very easy as you can log in with your Github account and create a project in a few minutes
Creating Svelte Project
Starting off, let’s create the svelte project using the command from the official svelte site
npx degit sveltejs/template svelte-login-supabase
cd svelte-login-supabase
Supabase provides a javascript client package to help with the connection to the Supabase project. We can install it using the npm install command
npm install @supabase/supabase-jsMore info about the package can be found in this link - https://github.com/supabase/supabase-js
Setting up Supabase
Create a new project or open an existing project. Supabase will configure a Postgress database for us and we can start writing SQL statements in the database to create the tables.
We will need a profile table for the user’s profile
create table profiles (
  id uuid references auth.users not null,
  updated_at timestamp with time zone,
  username text unique,
  display_name text,
  bio text,
  twitter_link text,

  primary key (id),
  unique(username),
  constraint username_length check (char_length(username) >= 3)
);

alter table profiles enable row level security;

create policy "User profile can be read by everyone."
  on profiles for select
  using ( true );

create policy "Users can create their own profile."
  on profiles for insert
  with check ( auth.uid() = id );

create policy "Users can update own profile."
  on profiles for update
  using ( auth.uid() = id );
We can write the SQL query to create table profiles using the above statements
Create table profiles
- id - Used to store the unique user id. This is linked with the authentication id of the user
- updated_at - Timestamp of the time when the profile is updated
- username - Unique username for the user
- display_name - Display name for the user in the application
- bio - Description for the user
- twitter_link - Link to add for the user’s twitter profile
We can add more constraints for the columns when creating the table.
- Username should be unique -
unique(username) - Username length constraint greater than 3 -
constraint username_length check (char_length(username) >= 3)
Row Level Security
Postgres offers Row Level Security which will help in making sure that users with proper authorization will make changes to the database. This offers one more level of security on top of the authenticated user.
In our scenario, we are having this table to update our user’s details. It should be visible to all the users. So read permission should be given for all
alter table profiles enable row level security;

create policy "User profile can be read by everyone."
  on profiles for select
  using ( true );
Authenticated users can only create/update their profiles. So we can have a policy checking if the updating user is same as the authenticated user
create policy "Users can create their own profile."
  on profiles for insert
  with check ( auth.uid() = id );

create policy "Users can update own profile."
  on profiles for update
  using ( auth.uid() = id );
https://www.postgresql.org/docs/current/ddl-rowsecurity.html
Setting up the environment in Svelte
Create a .env file in your root directory and we can add the Supabase environment variable there.
- URL of the Supabase Application
- Anonymous key for the application
Variables can be found when you navigate to Setting → API
SVELTE_APP_SUPABASE_URL - URL of the Supabase app found under Config
SVELTE_APP_SUPABASE_ANON_KEY - Public Anonymous key for the project
SVELTE_APP_SUPABASE_ANON_KEY - This key will be exposed in your application. This key is safe to use as long as you have proper Row Level Security turned on in your tables.
.env
SVELTE_APP_SUPABASE_URL=YOUR_URL
SVELTE_APP_SUPABASE_ANON_KEY=YOUR_KEY
Update config to reflect the environment variables
Supabase package which we installed earlier using .json file and so we need to update the rollup config to convert the .json file to ES6 format. We can use a plugin to do this work for us.
npm install --save-dev @rollup/plugin-jsonWe also need more plugins to take the variable from the .env file and use them in the rollup config file.
npm install --save-dev dotenv @rollup/plugin-replaceAll of these dependencies are dev dependencies and so they won’t increase the size of your final build.
Let’s update the rollup.config file to below so as to use both the plugins which we have installed
import svelte from 'rollup-plugin-svelte';
import commonjs from '@rollup/plugin-commonjs';
import resolve from '@rollup/plugin-node-resolve';
import livereload from 'rollup-plugin-livereload';
import { terser } from 'rollup-plugin-terser';
import css from 'rollup-plugin-css-only';

import { config } from 'dotenv';
import replace from '@rollup/plugin-replace';
import json from '@rollup/plugin-json'
const production = !process.env.ROLLUP_WATCH;

function serve() {
	let server;

	function toExit() {
		if (server) server.kill(0);
	}

	return {
		writeBundle() {
			if (server) return;
			server = require('child_process').spawn('npm', ['run', 'start', '--', '--dev'], {
				stdio: ['ignore', 'inherit', 'inherit'],
				shell: true
			});

			process.on('SIGTERM', toExit);
			process.on('exit', toExit);
		}
	};
}

export default {
	input: 'src/main.js',
	output: {
		sourcemap: true,
		format: 'iife',
		name: 'app',
		file: 'public/build/bundle.js'
	},
	plugins: [
		svelte({
			compilerOptions: {
				// enable run-time checks when not in production
				dev: !production
			}
		}),
		replace({
            __api: JSON.stringify({
                env: {
                    isProd: production,
                    ...config().parsed // attached the .env config
                }
            }),
            delimiters: ['', '']
        }),
        json(),
		// we'll extract any component CSS out into
		// a separate file - better for performance
		css({ output: 'bundle.css' }),

		// If you have external dependencies installed from
		// npm, you'll most likely need these plugins. In
		// some cases you'll need additional configuration -
		// consult the documentation for details:
		// https://github.com/rollup/plugins/tree/master/packages/commonjs
		resolve({
			browser: true,
			dedupe: ['svelte']
		}),
		commonjs(),

		// In dev mode, call `npm run start` once
		// the bundle has been generated
		!production && serve(),

		// Watch the `public` directory and refresh the
		// browser on changes when not in production
		!production && livereload('public'),

		// If we're building for production (npm run build
		// instead of npm run dev), minify
		production && terser()
	],
	watch: {
		clearScreen: false
	}
};
Connecting to Supabase
Most of our configuration is complete and we can dive into connecting with the Supabase application in Svelte.
Create a new file supabaseClient.js
import { createClient } from '@supabase/supabase-js'

const supabaseUrl = __api.env.SVELTE_APP_SUPABASE_URL
const supabaseAnonKey = __api.env.SVELTE_APP_SUPABASE_ANON_KEY

export const supabase = createClient(supabaseUrl, supabaseAnonKey)
Note: These variables will be exposed in our browser. Please be careful to not add more sensitive data. Our application is protected with Row Level Security and so you can use the Anonymous key even though it is exposed in the browser
Sign up Component
We can start by building a Sign up component which will get simple email and password from the user and then create an account in Supabase
Create a new component named Signup.svelte and add the following code
Method to create new user
<script>
	import { supabase } from "./supabaseClient";

	let loading = false;
	let email, password, confirmpassword;
	let message = { success: null, display: "" };

	const handleSignup = async () => {

		if (password != confirmpassword) {
			message = { success: false, display: "Password and Confirm Password fields do not match" };
			return;
		}

		try {
			loading = true;
			const { error } = await supabase.auth.signUp({ email, password });
			console.log(error);
			if (error) throw error;
			message = { success: true, display: "We have sent you an confirmation email. Please check your email" };
		} catch (error) {
			console.log(error);
			let errorMsg = error.error_description || error.message;
			message = { success: false, display: errorMsg };
		} finally {
			loading = false;
		}
	};
</script>
Creating the signup form
<form on:submit|preventDefault={handleSignup}>
	<div class="form-widget">
		<h1 class="header">Eternal Dev Community</h1>
		<p class="description">Create an account and join the community of developers</p>
		<div class="form-group">
			<label for="email">Email address</label>
			<input
				id='email' class="form-control" type="email" placeholder="Your email"
				bind:value={email}
			/>
		</div>
		<div class="form-group">
			<label for="password">Password</label>
			<input
				id='password' class="form-control" type="password" placeholder="Set your new password"
				bind:value={password}
			/>
		</div>
		<div class="form-group">
			<label for="confirmpassword">Confirm Password</label>
			<input
				id='confirmpassword' class="form-control" type="password" placeholder="Confirm your new password"
				bind:value={confirmpassword}
			/>
		</div>
		<div>
			<input type="submit" class="btn btn-success" value={loading ? "Loading" : "Sign up"}
				disabled={loading}
			/>
		</div>

		{#if message.success != null}
			<div class="alert {message.success ? 'alert-success' : 'alert-danger'}" role="alert">
				{message.display}
			</div>
		{/if}
	</div>
</form>
We have three input fields that collect the following data
- Email address of the user
- New password for the account
- Confirm password
Once we have these data, we can use the supabaseClient file which we wrote previously and call the signUp method of supabase and pass the email and password.
Signup method returns an error in our case and then we can check if it is undefined, then we have successfully created an account.
If there is an error, we display the error in the UI
Result of Signup component

Mail confirmation
Supabase takes care of the mail confirmation by automatically sending an email to the user with a confirmation link. This helps in removing unwanted account signups and keeps your accounts tidy.
After creating the account, an email with a link is sent to the user which can be configured on the Supabase settings page
You can also disable the mail confirmation from the settings

Customize the email template
Supabase allows its users to customize the template of the email being sent. You can update the template from the settings page

Login component
Similar to the Signup component, we can create the login component and call the signIn method from Supabase
Method to handle login of the user
<script>
	import { supabase } from "./supabaseClient";

	let loading = false;
	let email, password;
	let message = { success: null, display: "" };

	const handleLogin = async () => {
		try {
			loading = true;
			const { error } = await supabase.auth.signIn({ email, password });
			if (error) throw error;
			message = { success: true, display: "Successfully logged in!" };
		} catch (error) {
			let errorMsg = error.error_description || error.message;
			message = { success: false, display: errorMsg };
		} finally {
			loading = false;
		}
	};
</script>
Creating the form for login component
<form on:submit|preventDefault={handleLogin}>
<div class="form-widget">
<h1 class="header">Eternal Dev Community</h1>
<p class="description">Enter your email below to get a link to login</p>
<div class="form-group">
<label for="email">Email Address</label>
<input
id='email' class="form-control" type="email" placeholder="Your email"
bind:value={email}
/>
</div>
<div class="form-group">
<label for="password">Password</label>
<input
id='password' class="form-control" type="password" placeholder="Set your new password"
bind:value={password}
/>
</div>
<div>
<input type="submit" class="btn btn-success" value={loading ? "Loading" : "Log in"}
disabled={loading}
/>
</div>
{#if message.success != null}
<div class="alert {message.success ? 'alert-success' : 'alert-danger'}" role="alert">
{message.display}
</div>
{/if}
</div>
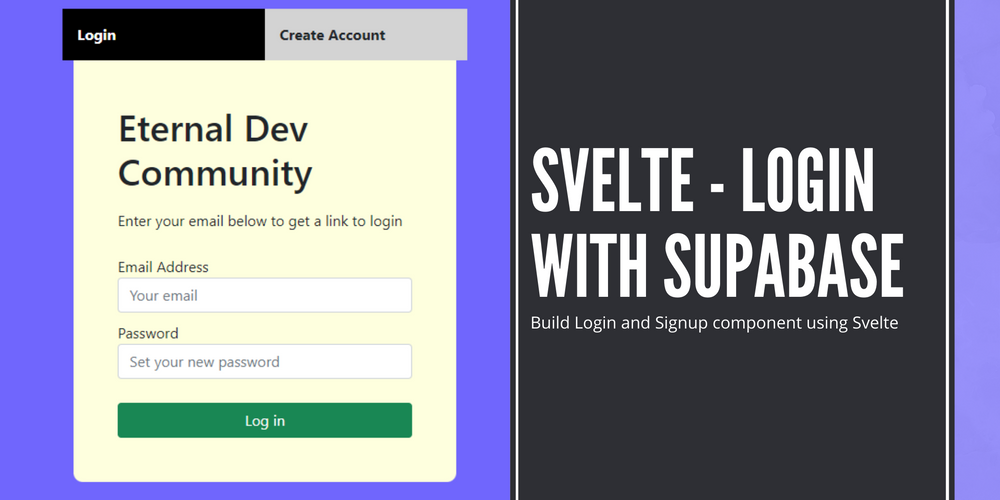
</form>Result of Login component

Creating Auth Component
After this create an Auth component that can help switch between the two components.
<script>
	import Login from "./Login.svelte";
	import Signup from "./Signup.svelte";

	let currentTab = "Login";

	const changeTab = (tab) => {
		currentTab = tab;
	};
</script>

<main class="container">
	<div class="row flex flex-center">
		<div class="col-4 offset-4 mt-5">
			<div class="row">
				<div class="col tab-heading {currentTab == 'Login' ? 'tab-active': ''}" on:click={() => changeTab("Login")}>
					<span>Login</span>
				</div>
				<div class="col tab-heading {currentTab == 'Signup' ? 'tab-active': ''}" on:click={() => changeTab("Signup")}>
					<span>Create Account</span>
				</div>
			</div>
			{#if currentTab === "Login"}
				<Login />
			{:else}
				<Signup />
			{/if}
		</div>
	</div>
</main>

<style>
	.tab-heading {
		font-weight: bold;
		padding: 1rem;
		background-color: lightgray;
	}

	.tab-active {
		background: black;
		color: white;
	}
</style>
Result of Auth Component
Create a profile page
We have the Sign up and log in features implemented. Let’s finish it off with a Profile page when the user is logged in. User can update their information after authentication in the writable store
Create a new file called sessionStore.js
import { writable } from 'svelte/store';

export const user = writable(false);
Create a Profile.svelte file and add the following code to fetch and update the data from the Supabase.
Fetching the data from Supabase
<script>
	import { supabase } from "./supabaseClient";
	import { user } from "./sessionStore";

	let loading = true;
	let username, display_name, bio, twitter_link;
	let message = { success: null, display: "" };

	async function getProfile() {
		try {
			loading = true;
			const user = supabase.auth.user();

			let { data, error, status } = await supabase
				.from("profiles")
				.select(`username, display_name, bio, twitter_link`)
				.eq("id", user.id)
				.single();

			if (error && status !== 406) throw error;

			if (data) {
				username = data.username;
				display_name = data.display_name;
				bio = data.bio;
				twitter_link = data.twitter_link;
			}
		} catch (error) {
			message = { success: false, display: error.message };
		} finally {
			loading = false;
		}
	}
</script>
We can make use of the supabase client to fetch the data from the profiles table by selecting the columns needed. id of the row will match the id of the user since we have that as a foreign key to that Auth table of supabase
Updating the user profile
async function updateProfile() {
		try {
			loading = true;
			const user = supabase.auth.user();

			const updates = {
				id: user.id,
				username,
				display_name,
				bio,
				twitter_link,
				updated_at: new Date(),
			};

			let { error } = await supabase.from("profiles").upsert(updates, {
				returning: "minimal",
			});

			if (error) throw error;
		} catch (error) {
			message = { success: false, display: error.message };
		} finally {
			loading = false;
		}
	}
Updating the data also involves calling the upsert function from supabase table and passing the values to update. Since the [user.id](http://user.id) is not changed all the future updates will be made to the same row.
returning variable in upsert helps in configuring how the data is returned from the API after the update is complete. Passing “minimal” will cause the API to not return any data.
Sign out
async function signOut() {
		try {
			loading = true;
			let { error } = await supabase.auth.signOut();
			if (error) throw error;
		} catch (error) {
			message = { success: false, display: error.message };
		} finally {
			loading = false;
		}
	}
Sign out function is self explanatory. Just call the signOut method in supabase and the user will be signed out.
Creating the profile form
<div class="container">
	<div class="row flex flex-center">
		<div class="col-4 offset-4 mt-5">
			<div class="row heading">
				<span class="col-8">Profile</span>
				<div class="col-4">
					<button class="btn btn-secondary" on:click={signOut} disabled={loading}>
						Sign Out
					</button>
				</div>
			</div>
			<form use:getProfile class="form-widget" on:submit|preventDefault={updateProfile}>
				<div class="form-group">
					<label for="email">Email</label>
					<input
						id="email" class="form-control" type="text" value={$user.email} disabled
					/>
				</div>
				<div class="form-group">
					<label for="username">Username</label>
					<input
						id="username" class="form-control" type="text"
						bind:value={username}
					/>
				</div>
				<div class="form-group">
					<label for="display_name">Display Name</label>
					<input
						id="display_name" type="text" class="form-control"
						bind:value={display_name}
					/>
				</div>
				<div class="form-group">
					<label for="bio">Bio</label>
					<textarea id="bio" class="form-control" bind:value={bio} />
				</div>
				<div class="form-group">
					<label for="twiiter_link">Twitter link</label>
					<input
						id="twiiter_link" type="text" class="form-control"
						bind:value={twitter_link}
					/>
				</div>

				<div>
					<input type="submit" class="btn btn-primary" value={loading ? "Loading ..." : "Update"}
						disabled={loading}
					/>
				</div>
			</form>
			{#if message.success != null}
				<div class="alert {message.success ? 'alert-success' : 'alert-danger'}" role="alert">
					{message.display}
				</div>
			{/if}
		</div>
	</div>
</div>
Fetching the data on form load
Form HTML element is added with use:getProfile attribute which helps in calling the getProfile function to load the data from the API
Similarly, we are calling the updateProfile method on form submit.
Result of Profile component

Source Code
The full source of the project can be found in this Github repo.
https://github.com/eternaldevgames/svelte-projects/tree/master/svelte-login-supabase
Final thoughts
Svelte and Supabase both make it easy to authenticate and authorize users for your web application. Supabase provides a free tier for your project which is easy to get started for your next project.
Stay tuned by subscribing to our mailing list and joining our Discord community